How to install aluminum tile trim?
How to install aluminum tile trim?
Aluminum tile trim installation instruction
This step by step article is about how to install aluminum tile trim.
Installing an aluminum tile trim is not difficult, but the techniques vary according to the support surface.
Therefore, if you have to install a metal tile edging on a wall (inside or outside corner) you have to spread the adhesive first and then secure the trim.
On the other hand, if you have to install a aluminum floor tile edging, the procedure is a little more complicated, as you should secure it with a couple of screws.
Nevertheless, you should be able to install the tile edging in a professional manner, provided you read our step by step guide.
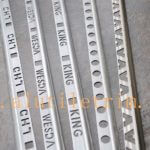
Select the aluminum edging according to the tile thickness.
We recommend you to take a piece of tile with you, when you go to your local diy store, otherwise the edging might not fit your needs.
In addition, if you want to protect the edge of the tiles, you should buy metal trims.
If you want to install the edging on an outside wall corner, you have to tile first one side.
Next, you should spread tile adhesive on the other side of the corner with a notched trowel.
Last but not least, you have to press the perforated flange of tile edging into the adhesive and align it with the wall tiles.
Use a spirit level to make sure the edging is plumb and then install the wall tiles into position.
Don’t forget to check out the rest of the tile projects, as there are many tips and tricks when installing ceramic tile.
The preparation stage is essential, if you want to get the job done as a professional.
In order to install a metal tile edging, you need the following:
Materials:
Adhesive for ceramic tiles
Screws
Tile edging
Tools:
Safety gloves, glasses
Drill machinery with drill bits
Measuring tape, framing square, pencil
Notched trowel
Screwdriver
Tips:
Spread the adhesive on small surfaces,
otherwise it will get dried soon
Use a level to check if the floor is horizontal, before spreading the adhesive
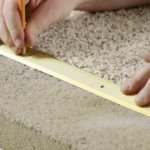
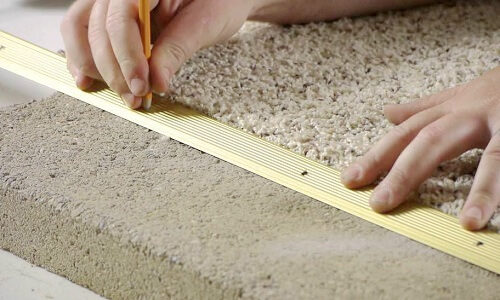
First align them into position and make the marks on the metal trims. Make sure you don’t move them while making the marks, otherwise they won’t fit into place.
Next, we had to cut the aluminum tile edging by using a miter box and a hacksaw. We strongly recommend you to use these tools, if you want to obtain accurate cuts.
Nevertheless, make sure you cut the tile edging exactly over the marks, otherwise it might not fit into location.
Although it is not compulsory, we secured the aluminum tile edging to the floor with several screws. In most of the cases, the tile adhesive will lock the trim into position, but be wanted to make sure it doesn’t slip in time.
The first step is to mark the holes on the concrete floor, every 15”, by using a marker. Remember that we have used a drill to make the holes on the tile edging.
Next, we have used a drill machinery and masonry drill bits to drill the holes in the concrete floor. Make sure the drill bit size is compatible with the dowels and screws you are going to use.
If you have a wooden sub floor, then you could drive in the screws directly in the joists, without making any pilot holes.
Use a vacuum to clean the residues in every drilled hole. Work with patience and with great care, as to make sure you don’t make mistakes.
Next, we inserted the plastic dowels in the holes and hit them gently with a mallet.
Make sure you don’t use too much force, otherwise you can damage the dowels. In addition, the dowels should be aligned with the floor surface.
Afterwards, we have secured the metal tile edging by driving in the screws. In order to fasten them, we have used a screwdriver.
Smart tip: Choose screws with a small head, otherwise the tile might not fit in the tile edging.
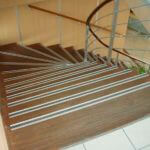
Next, we had to install the aluminum edging on the other side of the stairs landing. Align the tile metal edging properly, otherwise you will have issues when fitting it into place.
Mark the cut line on the trim and cut it, by using the hacksaw and the miter box
Next, we installed the aluminum tile edging into place, by driving in several screws. Work with great care and patience, a to get the job done in a professional manner.
Remember that it’s not compulsory to secure the edging with screws. Therefore, you have to spread a thin layer of adhesive and afterwards lay the edging, making sure it is level and aligned.
Next, you have to cut the tiles as to fit into location. Use a market and a L-square to draw the cut lines on the tiles.
In order to cut the tiles, you could use a tile cutter or a wet saw. Work with great care as to get the job done properly.
Continue marking and cutting the tiles, before laying them on adhesive. From our experience, it is easier to mark the tiles and then to cut them.
Smart tip: Afterwards, you should mix tile adhesive, in a clean bucket.
Clean the floor thoroughly, making sure you remove the residues and the blemishes. It is essential that the surface to be level, otherwise you won’t be able to lay the tiles as a professional.
Use a notched trowel to spread tile adhesive on the surface. Work with patience and with great care, as the thinset bed should be even on the whole surface.
Smart tip: Hold the trowel at about 45º, otherwise the ridges won’t be straight and thick enough to secure the tiles.
Next, start laying the tiles on the adhesive. Use tile spacers between the joints, as to get even spaces between tiles.
Smart tip: Twist gently the tiles when laying them on the adhesive, otherwise they won’t be secured properly.
As we have already said, it is essential to install tile spacers between the tiles, as to get consistent joints on the whole surface.
The spacers come in different sizes, therefore you should choose the ones which fit your needs and tastes best.
Use a mallet to hit gently the tiles, if they are not perfectly level. One possible cause of this issue might be the bed of thinset. If you haven’t spread the adhesive properly, the tiles won’t be perfectly horizontal.
Nevertheless, in most of the cases you can fix this problem by using the rubber hammer
Use again a large spirit level, to check the alignment of the tile flooring. If the tiles are not perfectly horizontal, you should remove them from position, take off the adhesive bed and spread it again, this time properly.
Lay the tiles and check if they are level.
Installing tiles in the corners of the metal edging is not difficult if you take good measurements. Work with care and attention to draw accurate marks on a tile.
Smart tip: Use a market and and L-square to draw the cut lines.
We recommend you to use a wet saw to make complex cuts, like the one in our project. A wet saw for an amateur home owner shouldn’t cost more than 100-150 $, therefore you should buy one for all your ceramic tile projects.
Fill the reservoir with water (as to cool the blade) and cut the tile, making sure the blade goes exactly over the cut line. If you don’t have experience in working with wet saws, practice a little on several waste tiles.
Next, after you have cut the tile at the needed dimensions, you have to lay it into position. Spread tile adhesive on the surface (or better on the back of the tile) and set the tile floor, making sure you use spacers around its corners.
After you have lain the tiles on the whole surface of your floor and inside the metal edging, you have to wait for about 30 minutes, as to let the adhesive to dry out a little.
Last but not least, use a clean sponge to remove the adhesive form the tile flooring. Remember that you shouldn’t use too much water, otherwise you might move the tiles from their position.
Smart tip: Work with great care and check again if the floor is level on the whole surface. After the adhesive has dried out, it would be hard to solve these kind of issues.
copy from how to specialist
More Information I Want To Know
 How to apply aluminum tile trim?
- 2015 aluminum tile trim individual custom-made solutions
- The general 3 mechanical finishes for aluminum tile trim before anodizing
- Die process, aluminum tile trim production first step
- Stair nosing maintenance and installation tips
- European customer aluminum tile trim orders delivery